I recently wrote a post where I did some exploring into managed identity for Azure app services. I showed how to get an access token, but only briefly mentioned the Microsoft.Azure.Services.AppAuthentication package, and said nothing about how to write .NET Core code that works both locally, in your CI pipeline and on Azure app services.
That is exactly what this post is about.
Microsoft.Azure.Services.AppAuthentication
The AppAuthentication package is a simple package centered around the AzureServiceTokenProvider class. This class has two methods that both fetches an access token. Either as just the plain access token string GetAccessTokenAsync or as a class with some meta data and the access token GetAuthenticationResultAsync.
The AzureServiceTokenProvider constructor takes a connectionstring as a parameter. This connectionstring is what we use to configure the AzureServiceTokenProvider depending on what environment we are running in. I will go into detail about the following environments:
- Local
- CI Pipeline
- Azure app service
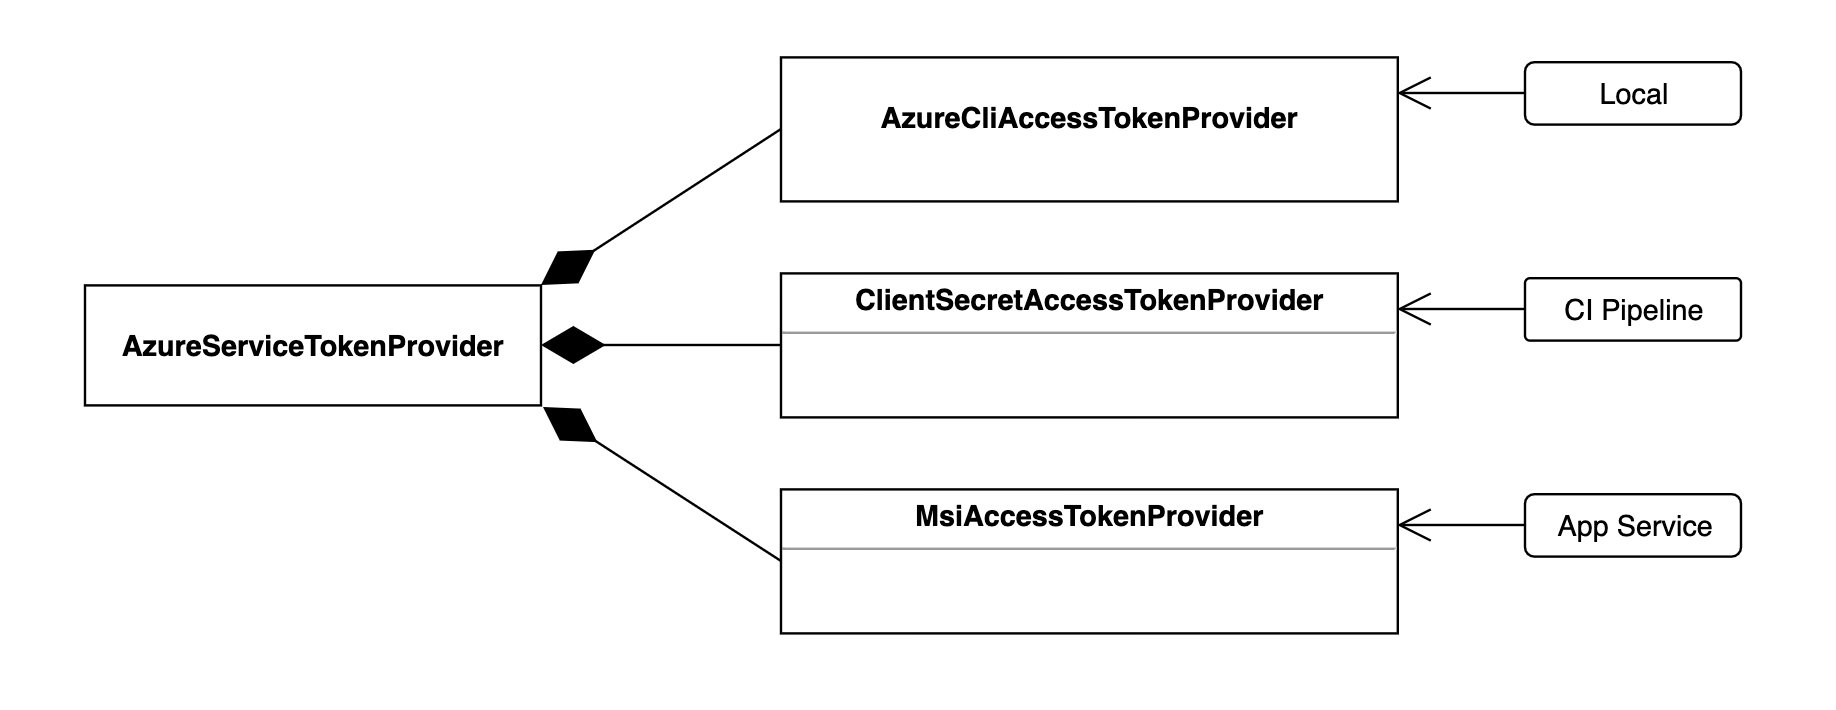
The actual method used to fetch tokens is implemented as a variation on the strategy pattern.
Different implementations are available for different scenarios. The three implementations I will take a closer look at is shown in the diagram below.

Which TokenProvider that will be used is selected using the connection string.
Using the following connectionstrings will give TokenProviders as shown:
- "RunAs=Developer;DeveloperTool=AzureCLI" ->
AzureCliAccessTokenProvider - "RunAs=App;AppId={AppId};TenantId={TenantId};AppKey={ClientSecret}" ->
ClientSecretAccessTokenProvider - "RunAs=App" ->
MsiAccessTokenProvider
In other words we will typically configure the AzureServiceTokenProvider when we register it in our IoC container with a connectionstring that will be one of the three mentioned depending on whether we are running the app on our local workstation, in the CI Pipeline or on our Azure Web site/app service.
The Code
All the following code is also available here on github.
Azure CLI Token provider - local
First we will try the AzureCliAccessTokenProvider which is what you typically would use when running your code locally on your workstation,
To try the AzureCliAccessTokenProvider we need to provide the first form of the connection string as shown here:
class Program
{
    static async Task Main(string[] args)
    {
        var provider = new AzureServiceTokenProvider("RunAs=Developer;DeveloperTool=AzureCLI");
        try
        {
            var token = await provider.GetAccessTokenAsync("https://management.azure.com/");
            Console.WriteLine($"token is : {token}");
        }
        catch (AzureServiceTokenProviderException ex)
        {
            Console.WriteLine($"Got exception. Have you logged in? : {ex.Message}");
        }
    }
}
Before you run the code make sure that you are logged in to your azure subscription in Azure CLI.
To login run: az login in your favorite terminal.
Then run the above code and you should see an access token.
Client secret Token provider - on the CI server
Next we will take the ClientSecretAccessTokenProvider for a spin.
Here we will not be logging in as our selves, but we will rather run the code under a service principal identity.
This is typically something we would do on the CI server.
First we need to create a service principal. This can be done using Azure CLI like this:
az ad sp create-for-rbac --skip-assignment
It should give something like this:
{
  "appId": "9eb32dee-fa21-4c1e-b652-73f29c00d895",
  "displayName": "azure-cli-2019-05-21-20-20-09",
  "name": "http://azure-cli-2019-05-21-20-20-09",
  "password": "d4f41304-8393-4dfc-9c2b-e35acf7ccb44",
  "tenant": "2625ee56-ac41-4ff6-83d1-371fde29e9f6"
}
We change the code slightly
class Program
    {
        /// Application Id of the service principal
        /// Tenant id where the service principal is defined
        /// Client secret for the service principal
        static async Task Main(string appId, string tenantId, string clientSecret)
        {
            if (string.IsNullOrEmpty(appId) ||
                string.IsNullOrEmpty(tenantId) ||
                string.IsNullOrEmpty(clientSecret))
                {
                    Console.WriteLine("appId, tenantId and clientSecret must be specified");
                    return;
                }
            var provider = new AzureServiceTokenProvider($"RunAs=App;AppId={appId};TenantId={tenantId};AppKey={clientSecret}");
            try
            {
                var token = await provider.GetAccessTokenAsync("https://management.azure.com/");
                Console.WriteLine($"token is : {token}");
            }
            catch (AzureServiceTokenProviderException ex)
            {
                Console.WriteLine($"Got exception. : {ex.Message}");
            }
        }
    }
Now if we run the code like this:
dotnet run --app-id 9eb32dee-fa21-4c1e-b652-73f29c00d895 --tenant-id 2625ee56-ac41-4ff6-83d1-371fde29e9f6 --client-secret d4f41304-8393-4dfc-9c2b-e35acf7ccb44
We should again see an Access Token.
We see that in this case we again need to provide a secret. The secret for the service principal needs to be passed in. In e.g. Azure DevOps it could be stored in a secret pipeline variable.
If you should be wondering about what is going on with the parameters on the Main method I am using System.CommandLine.DragonFruit
which is a small library from Microsoft for handling of command line arguments.
MSI Token provider - app service
The final example is using the MsiAccessTokenProvider.
This version needs to run on an Azure app service to work. It is dependent on the environment variables described in the previous post being present and http endpoint for getting the access token.
The Azure app service also needs to be configured as described in the same post for it all to work.
But once that is in place the code should work.
private async Task GetAccessToken()
    {
        var provider = new AzureServiceTokenProvider("RunAs=App");
        try
        {
            return await provider.GetAccessTokenAsync("https://management.azure.com/");
        }
        catch (AzureServiceTokenProviderException ex)
        {
            Console.WriteLine($"Got exception when getting access token : {ex.Message}");
            throw;
        }
    }
Summary
As we have seen the AzureServiceTokenProvider works without any changes besides the connection string.
By injecting the connection string into our code we can have applications that works locally, on the CI server and on Azure app services. Locally and on the Azure app service it all works without any secrets that needs to be shared and managed in the development team.

