
This blog post will guide you on how to implement Norwegian BankID and BankID on mobile, using a BankID provider named Signicat, which is one of the partners recommended by BankId.
Signicat offers a demo client open for everyone, so it's easy to start coding, and it should get you up and running pretty quickly. They have extensive documentation, but it can be difficult to locate the stuff that you actually need. They have a code example in python, but nothing for .NET, so that's the reason behind this blog post.
Agenda
- Describe the Siginicat OIDC BankID authentication flow
- Create an MVC app, which embeds the BankID authentication flow in an iframe.
- API-integration using Refit to retrieve user information and display it in the app.
TLDR; Code available on GitHub.
The Signicat flow
The example documentation describes the following flow:
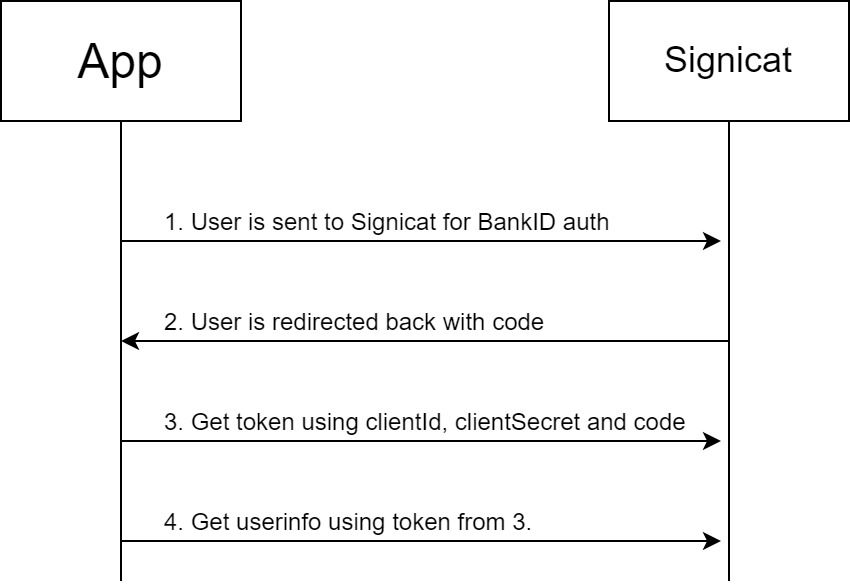
Step 1: Construct Signicat URL
First, a URL is constructed to initiate the BankID process on the Signicat OIDC server. The user can be redirected to this URL, but in this example it will be embedded in an iframe. The iframe src:
https://preprod.signicat.com/oidc/authorize?response_type=code&scope=openid+signicat.national_id&client_id=demo-preprod&redirect_uri=https://localhost:5000/redirect&state=123abc&acr_values=urn:signicat:oidc:method:nbid
| preprod.signicat.com | The URL for the open test site for Signicat. |
| scope | openid is mandatory. + data you want returned see Demo service. signicat.national_id returns SSN of the user. |
| redirect_uri | Where you are redirected after the authentication flow. For Signicat, the following redirect URIs are preconfigured and may be used: https://localhost:8080/redirect https://localhost:5000/redirect https://localhost/redirect http://localhost/redirect |
| acr_values | Define which authentication method to use. nbid for regular BankID and nbid-mobil for BankID on mobile. |
| state | Can be anything. |
The Signicat server will redirect the user to a redirect URI once the user has finished authenticating and authorizing the access for the user.
The redirect URI will have two query parameters - state and code:
state is the original value from the request.
code is what you need to perform the OIDC API calls.
Step 2: Request token
Perform API call to request token, using the code retrieved in step 1:
curl -XPOST "https://preprod.signicat.com/oidc/token" -H "Authorization: Basic ZGVtby1wcmVwcm9kOm1xWi1fNzUtZjJ3TnNpUVRPTmI3T240YUFaN3pjMjE4bXJSVmsxb3VmYTg=" -d "client_id=demo-preprod&redirect_uri=https://localhost:5000/redirect&grant_type=authorization_code&code=CODE GOES HERE"
Notes:
- Redirect URI must be the same as the initial one.
- The authorization header is Base64 encoded clientId and clientSecret:
demo-preprod:mqZ-_75-f2wNsiQTONb7On4aAZ7zc218mrRVk1oufa8 - Content-Type of the API call is application/x-www-form-urlencoded
- The request parameters are using snake_case
Step 3: Get user info
Perform API call to retrieve user info using the access token from step 2:
curl -XGET "https://preprod.signicat.com/oidc/userinfo" -H "Authorization: Bearer YOUR_ACCESS_TOKEN"
Implementing the Signicat flow in .NET Core
Step 1: MVC app with iframe
First, I created a new ASP.NET Core MVC app on .NET Core 3.1, and removed the stuff I didn't want (jQuery etc.), leaving only the HomeController as an entry point.
In the Home index view added an iframe to contain the BankID authentication flow, using the src from step 1 in the Signicat flow.
Step 2: MVC redirect handling
A model for the query params returned in the redirect URI:
public class BankIdCallback
{
    public string Code { get; set; }
    public string State { get; set; }
}
Then, I need a new route to handle the redirect:
[HttpGet("redirect")]
public ActionResult BankIdCallback(string code, string state)
{
    // Code here
}
Step 3: API calls using Refit
When handling HTTP requests in .NET, I recommend using Refit.
Nuget can be found here.
First, create an interface to represent Signicat:
[Headers("Authorization")]
public interface ISignicatApi
{
    [Post("/oidc/token")]
    Task<TokenResponse> GetToken([Header("Authorization")] string authorization, [Body(BodySerializationMethod.UrlEncoded)] Dictionary<string, object> data);

    [Get("/oidc/userinfo")]
    Task<UserInfo> GetUserInfo([Header("Authorization")] string authorization);
}
Notice how Refit handles URL encoding. It's really nice to let Refit handle this.
Signicat contracts using snake_case:
public class TokenResponse
{
    [JsonProperty("access_token")]
    public string AccessToken { get; set; }

    [JsonProperty("token_type")]
    public string TokenType { get; set; }

    [JsonProperty("refresh_token")]
    public string RefreshToken { get; set; }

    [JsonProperty("expires_in")]
    public int ExpiresIn { get; set; }

    [JsonProperty("id_token")]
    public string IdToken { get; set; }
}

public class UserInfo
{
    [JsonProperty("sub")]
    public string Sub { get; set; }

    [JsonProperty("signicat.national_id")]
    public string SocialSecurityNumber { get; set; }
}
Also, Refit needs to be registered:
services.AddHttpClient(nameof(ISignicatApi), c =>
    {
        c.BaseAddress = new Uri("https://preprod.signicat.com");
        c.DefaultRequestHeaders.Add("ContentType", "application/json");
        c.DefaultRequestHeaders.Add("Accept", "application/json");
        c.DefaultRequestHeaders.Add("User-Agent", "Novanet");
    })
    .AddTypedClient(RestService.For<ISignicatApi>);
Step 4: Using the Refit service in the MVC controller
The ISignicatApi is injected in the MVC controller, and the token request is built using snake_case:
[HttpGet("redirect")]
public async Task<ActionResult> BankIdCallback(string code, string state)
{
    var credentials = Convert.ToBase64String(Encoding.UTF8.GetBytes("demo-preprod:mqZ-_75-f2wNsiQTONb7On4aAZ7zc218mrRVk1oufa8"));

    var token = await _signicatApi.GetToken(
        $"Basic {credentials}",
        new Dictionary<string, object>
        {
            {"client_id", "demo-preprod"},
            {"redirect_uri", "https://localhost:5000/redirect"},
            {"grant_type", "authorization_code"},
            {"code", code}
        });

    var userInfo = await _signicatApi.GetUserInfo($"Bearer {token.AccessToken}");

    return View("BankIdCallBack", userInfo.SocialSecurityNumber);
}
Step 5 - Displaying the user info
For demo purposes the view could just display the social security number and job done. But in real life you don't want to keep the iframe after successful authentication. You might not even want the MVC controller to perform the API-calls.
So we need a way for the iframe to send the social security number to the MVC view. There are several ways to do this, I prefer using dispatchEvent which is widely supported.
The BankIdCallBack view will just dispatch the input:
@model string
<script>
    var event = new CustomEvent('bankIdResult', { detail: '@Model' });
    window.parent.document.dispatchEvent(event);
</script>
In this example, the model is the social security number. But it could also be the code from the redirect query param, and then let something else handle the API calls. (You might not want to toss a social security number around in events like this).
Last piece of the puzzle: The Home index view needs to listen to this event, and replace the iframe with the ssn when it's retrieved:
<script>
    window.document.addEventListener("bankIdResult", function (event) {
        document.querySelector("iframe").style.display = "none";
        document.getElementById("bankIdResult").innerHTML = event.detail;
    });
</script>
And that's it, really. Now you can add your own functionality knowing that the user is who he claims to be.
The result
Note: This example covers regular Norwegian BankID. If you want BankID on mobile, change the Signicat URL in step 1. Use nbid-mobil in the acr_values, instead of nbid. Be aware that testing BankID on mobile requires a dedicated test SIM card that can be issued by Signicat.
Code
The full code example is available on GitHub.
References:
- OpenID connect: https://developer.signicat.com/documentation/authentication/protocols/openid-connect/how-is-this-different-from-saml-2-0/
- Signicat demo service: https://developer.signicat.com/documentation/other/demo-service/
- Signicat full-flow example: https://developer.signicat.com/documentation/authentication/protocols/openid-connect/full-flow-example/
- Refit: https://github.com/reactiveui/refit