Laying the groundwork
New project
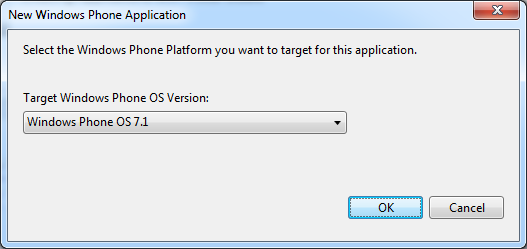
Let's start out by creating an standard Windows Phone 7 app (selecting version 7.1 as the framework)
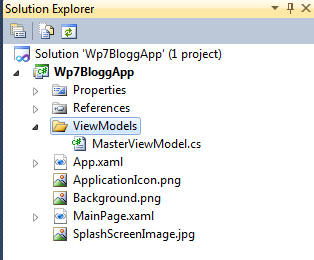
This should leave us with a codetty empty solution with only MainPage.xaml, App.xaml and some images. Leave all those where they are.
Creating a base ViewModel
The next thing we'll do is add a new folder we'll call ViewModels, and inside that new class which we'll call MasterViewModel.cs.
The MasterViewModel will act as a aggregate root for the page specific viewmodels we'll add later, and at least in my apps, this really speeds up development and makes it easy to create a reliable Windows Phone 7 app. You'll get the point later on ;)
Setting up App.xaml.cs
The App.xaml.cs is much like the Global.asax in a web project, and provides us static access to both application level events, and stuff that we might need throughout our application lifecycle. This is where we want to add a reference to our MasterViewModel. We'll add the reference as a static singleton
We also need to set the _viewModel for the first time. For that we'll use the method CompleteInitializePhoneApplication for that, to make sure the Phone is ready (hint: it's in the region 'Phone application initialization' - yes - Region :/)
        private static MasterViewModel _viewModel;
        public static MasterViewModel ViewModel
        {
            get
            {
                if (_viewModel == null)
                    _viewModel = new MasterViewModel();
            return _viewModel;
        }
    }
    ...
    private void CompleteInitializePhoneApplication(object sender, NavigationEventArgs e)
    {
        // Set the root visual to allow the application to render
        if (RootVisual != RootFrame)
            RootVisual = RootFrame;

        // Remove this handler since it is no longer needed
        RootFrame.Navigated -= CompleteInitializePhoneApplication;

        // Initialize the ViewModel when the Framework is done initializing
        _viewModel = new MasterViewModel();
    }
This enables us to access the MasterViewModel from anywhere by calling App.MasterViewModel. You'll see in a minute that this will be a huge advantage.
The Page viewmodel
Now that we've gotten our MasterViewModel up and running, the it's time to actually do something with it.
I like to have a separate ViewModel for every XAML page in my app, as it keeps it clean and simple, and also helps me navigating to the correct ViewModel when I want to make changes.
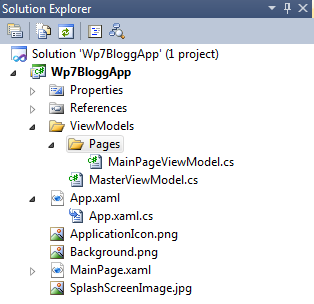
Let's add a new subfolder to the ViewModels folder, which we'll call "Pages". Add a new class to that folder called "MainPageViewModel". By keeping the name consistent with the name of the XAML, it's easy to know which ViewModel belongs to which XAML View:
Here comes the trick that I use - Make "MainPageViewModel" inherit from a class called ViewModel (which we haven't created yet, but we'll get to that in a minute)
namespace Wp7BloggApp.ViewModels.Pages
{
    public class MainPageViewModel: ViewModel
    {
}

}
And as for the implementation of ViewModel, we'll keep it simple for now, but this will end being useful later on in this series:
public class ViewModel : INotifyPropertyChanged
{
    public event PropertyChangedEventHandler PropertyChanged;
}
As you can see, we put the invaluable INotifyPropertyChanged implementation on our BaseViewModel, making it unnecessary to implement it on our ViewModels in the rest of the project. This interface enables our application to utilize the glorious two-way or one-way bindings when we start working with the XAML.
Simple UI bindings
Alright - enough boilerplate code for a while. Let's add a property to our ViewModel, and verify that we can actually set it as a datacontext, and bind data to it.
In order to do this, we need to tell the MainPage.xaml that we are using the MainPageViewModel as its DataContext, and for now we'll hardcode this into the MasterViewModel (yes, yes - dirty - don't worry.. I've got a few tricks up my sleeve for later ;))
Anyway, let's do this to our MasterViewModel:
    public class MasterViewModel
    {
    private PhoneApplicationPage CurrentPage
    {
        get
        {
            return ((App)Application.Current).RootFrame.Content as PhoneApplicationPage ?? new MainPage();
        }
    }

    public ViewModel CurrentViewModel { get; private set; }

    public MasterViewModel()
    {
        CurrentViewModel = new MainPageViewModel();
        CurrentPage.DataContext = CurrentViewModel;
    }
}
Let's go through what I've done here:
First, I'm adding a reference to the current PhoneApplicationPage, and initializing it as an instance of MainPage() if it's nothing.
Second, I'm bootstrapping the View in the MasterViewModel by manually instantiating the MainPageViewModel, and assigning it to the CurrentPage.DataContext
What do we gain by this?
We actually gain a couple of things:
1. We don't care about what page we're actually on
2. We don't care about what ViewModel class is assigned to CurrentViewModel.
We simply trust ourselves to keep the two in sync.
But just trust me on the implementation for now as we'll implement some neat features concerning this in Part 2.
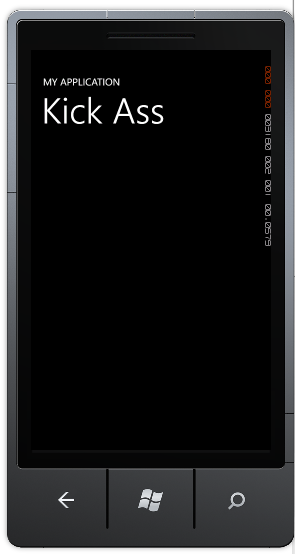
Next, let's just add a property on our MainPageViewModel that we can bind to in the MainPage.xaml. Let's call it Title, and assign the value "Kick Ass" in the class constructor
public class MainPageViewModel: ViewModel
{
    public MainPageViewModel()
    {
        Title = "Kick Ass";
    }
public string Title { get; private set; }

}
Now that we've done that, binding this to a TextBlock in our XAML should be a walk in the park. Just find the following code in MainPage.xaml and replace the PageTitle.Text property with {Binding Title}
	    <!--TitlePanel contains the name of the application and page title-->
        <StackPanel x:Name="TitlePanel" Grid.Row="0" Margin="12,17,0,28">
            <TextBlock x:Name="ApplicationTitle" Text="MY APPLICATION" Style="{StaticResource PhoneTextNormalStyle}"/>
            <TextBlock x:Name="PageTitle" Text="{Binding Title}" Margin="9,-7,0,0" Style="{StaticResource PhoneTextTitle1Style}"/>
        </StackPanel>
And for the first time - Hit F5 to run the application in the Emulator, and low and behold, we've got data binding!